How to Set Up A Staging Site on SiteGround
Not sure how familiar you are with it, but testing new features/releases on a test “staging environment” is pretty much the industry standard in tech. I’ve been responsible for a lot of quality checks on staging myself. And let me tell you one thing—well, two things:
- Staging environments are great for picking up on those minor, tiny teeny issues you wouldn’t have noticed immediately.
- Never ever, ever deploy anything on a Friday: It just always goes wrong. We’ve got a five Friday streak going on at work right now. Whenever my boss tries to get something out there on Friday, everyone—and I mean, everyone: product, development, marketing, sales, even our third-party SEO agency—freaks out and says no. Like, it’s cursed. Okay?
But enough about company superstitions. My point is, it doesn’t matter if you’re a multi-million dollar company or a small blogger. If you want to tinker around with your live (we call it that or production) site, make some changes to the design or template, you should seriously set up a staging site first.
Why You Should Set Up A Staging Site
Now, I know what you’re thinking: my website isn’t that complicated. And yes, that’s true. But have you ever had your website go down? Or look completely wrong because of something as dumb as a plugin incompatibility? Well, think of that on a bigger scale. Imagine that (like me), your site has just hit a consistent four figures in website visits and you’ve decided to redesign it to get more people to sign up for your newsletter or sell your products.
And you’ve picked out everything: the new theme, the colours…all of it. But the second you publish, your site breaks. And that’s when you’ll be scrambling. Because now you have people visiting your site who can’t access it or leave because it looks weird and they can’t find what they’re looking for. Losing 1–3 visitors over a few hours—or even a day or two—isn’t a big deal when you’ve got a small audience.
But if you’ve only started seeing traction on social media, started seeing people subscribe to your newsletter and buy your products, this is a make or break moment for you. Why would people trust you if you can’t keep your site up?
Here’s where staging comes in. If you want to make big site changes without ruining your live site, you need staging and that’s not all.
1. You’re protecting your live site
As I’ve just laid it out for you: making any significant changes to your actual live site is essentially asking for things to go wrong. And you can’t have that. Especially when there’s an audience to witness it.
A staging site gives you a safe environment to test things. It’s a duplicate of your actual site which you can essentially play around with, without worrying about the risk of broken layouts, downtime, or embarrassing glitches.
2. You can preview design changes properly
It’s one thing to imagine how your homepage will look with that new layout or font combo. It’s another to actually see it. This always happens. Something might look good on a demo site but when you actually implement it on your own? Nah, it’s just not how you thought it would be.
A staging site lets you view design changes in full context—on desktop and mobile—before anyone else does. This way you can easily fix stuff that you don’t like. Worse comes to worse, you don’t like the design changes you made and you can just scrap it altogether. And it won’t affect your actual site at all.
3. You can troubleshoot and debug calmly
Have you ever found the perfect plugin for your SEO or contact form needs and you spend a good hour setting it up…only to find out that it clashes with your other plugins and you can’t install it anymore? Yeah, well, that’s happened to me way too many times now.
And a staging site gives you the chance to test out these things along with template (or WordPress) updates, custom code, or performance tweaks without pressure. You get to troubleshoot, break things, fix them, and repeat at your own pace.
4. It’s your private workspace
I like to think of my staging site as my own little design kingdom. I get to try random themes I found on the internet, experiment with page layouts and even mess around with colour palettes.
Side Note: New blog coming out on colour palettes soon. But my point is, no one sees what you’re doing on staging. You can experiment, start over, undo changes, and mess around as much as you want. It’s like having a first, second and third draft before you publish.
5. It makes launching changes faster and smoother
Since staging lets you work out all site-related issues ahead of time, deploying changes only takes a few minutes, not hours of panicked fixes and stress. You’re not scrambling last-minute, you’re just clicking “go.”
And personally, that’s how I like my push to productions. Can things go wrong? Of course they can. But can you avoid them if you do it right? Hell, yes. As long as you’ve got your QA process in check and don’t deploy on a Friday.
How to Set Up Staging on SiteGround: A Step-by-Step Guide
So, now that you know why you should set up a staging site, let’s help you set one up. Let’s begin.
1. Accessing Staging in SiteGround
After logging into your SiteGround account, go to the “Websites” tab. There, under your site’s name, you will see “Site Tools.” Click on that.
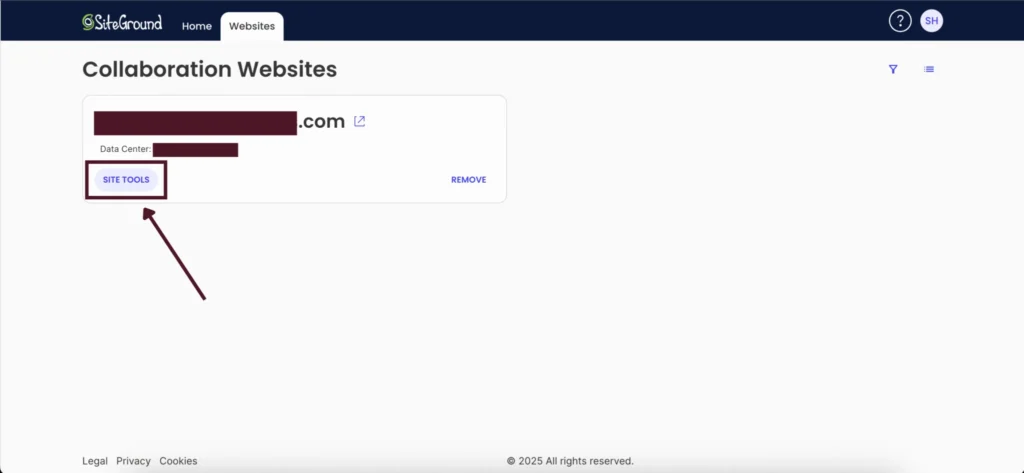
(note: certain details have been redacted for privacy)
This will take you to the site tools dashboard.
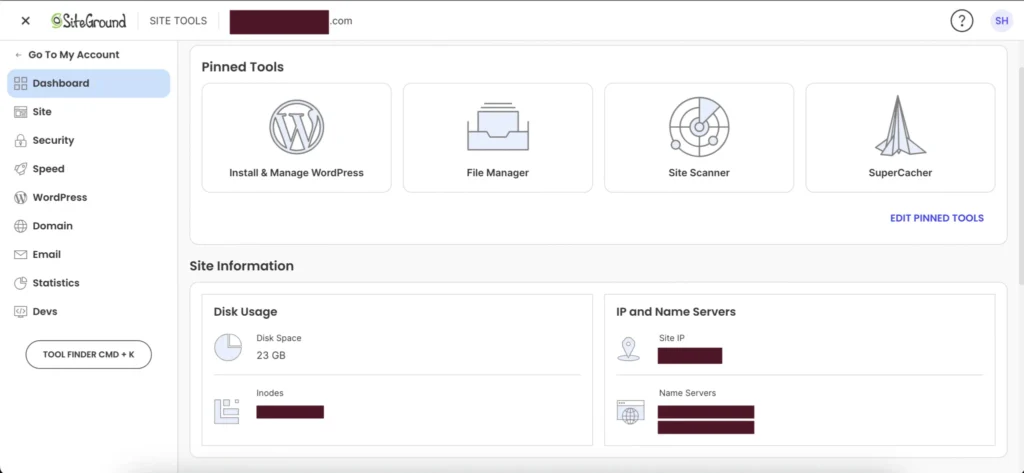
On the left sidebar, go to WordPress > Staging.
Under “Select WordPress Installation,” choose your website (be careful if there are multiple):
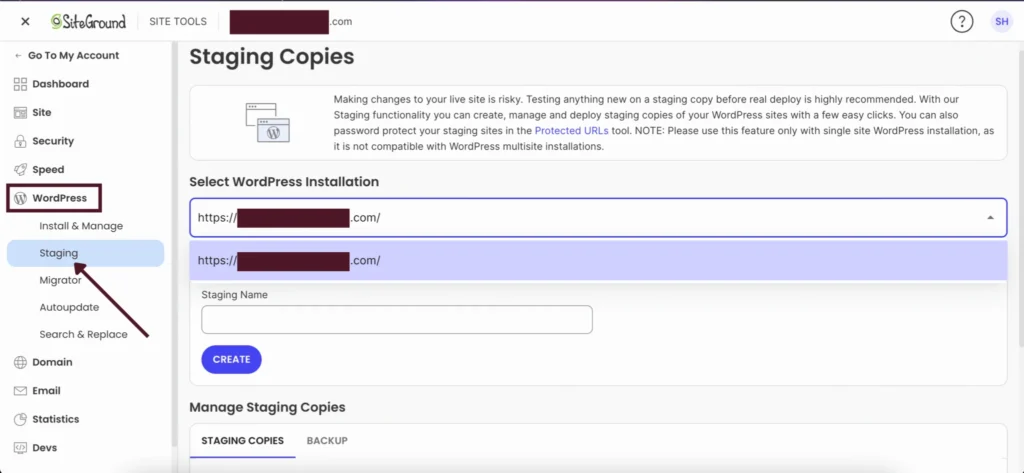
And then, under “Staging Name,” enter a name for your staging site. It doesn’t have to be staging.yoursitename.com. You can even simply call it staging. I did that because this particular site already had multiple staging copies and we have a very specific naming convention for those. I didn’t want to mess that up.
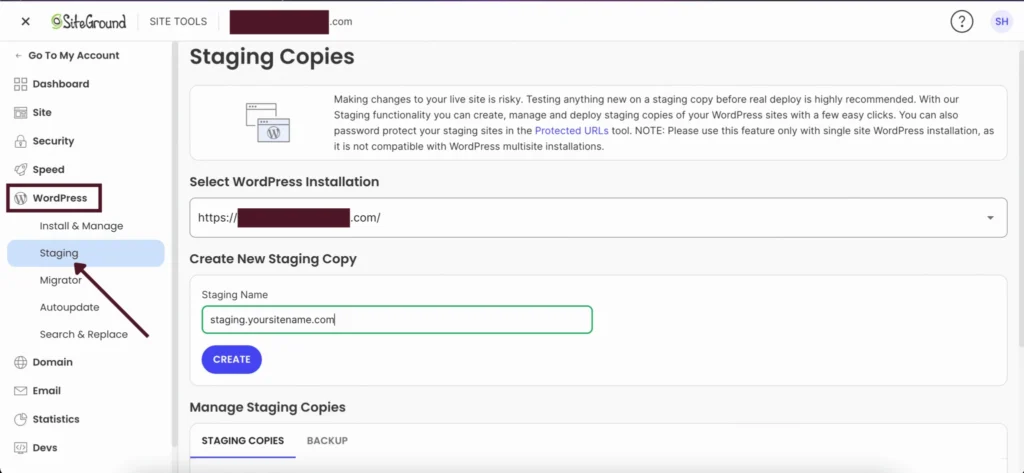
And then click on “Create.” Depending on the template or additional code on your site, the following pop-up will show up. For an exact duplicate of your website, select all and click on “Confirm.”
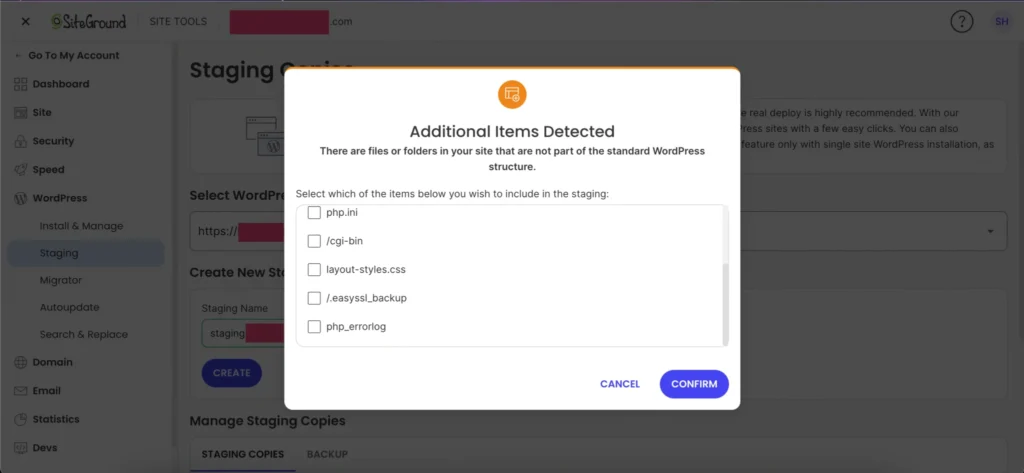
(this popup doesn’t always appear)
And that’s it! Your staging site has been created.
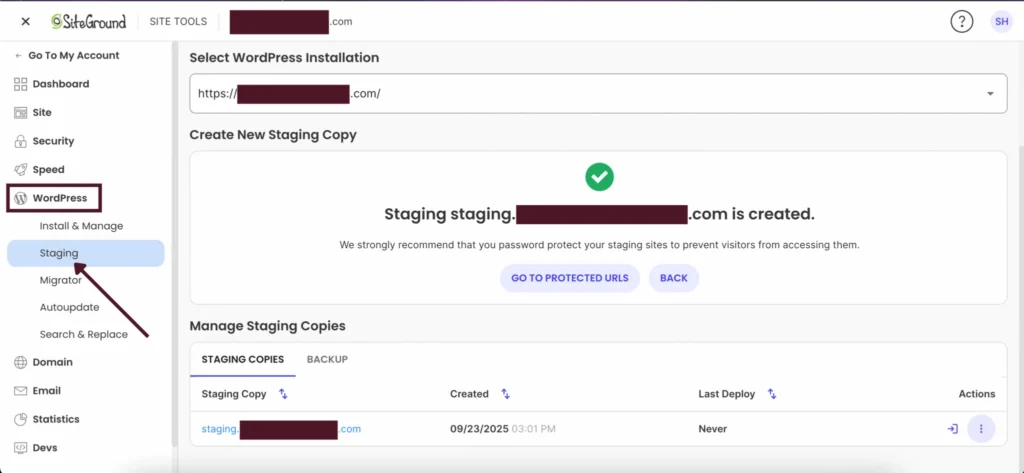
You’ll be able to see it show up under “Managing Staging Copies.” It’ll have the date and time showing up too.
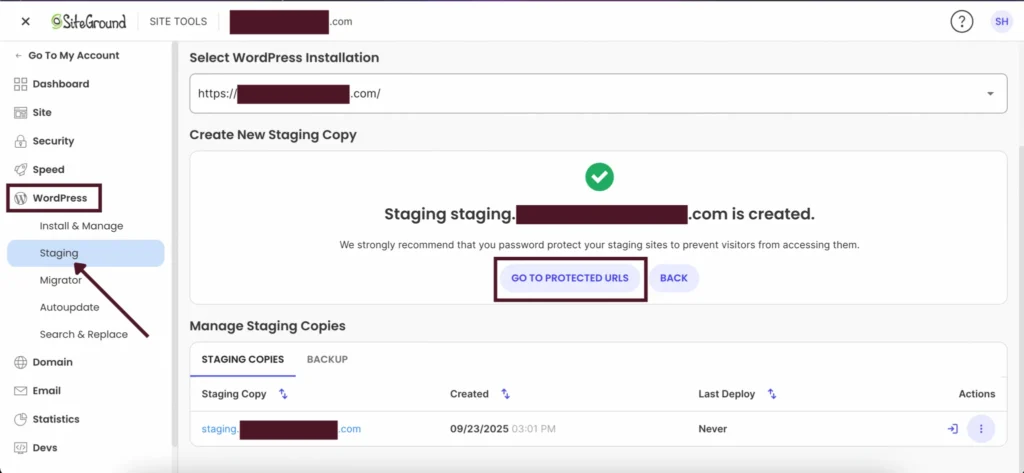
2. Keeping Your Staging Site Private
Before moving forward, don’t forget to click on “Go To Protected URLs.”
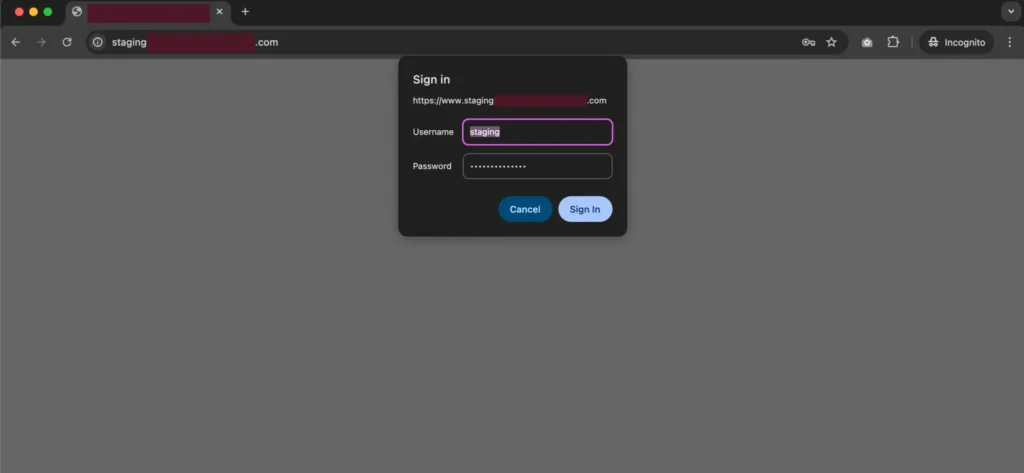
(this keeps your staging site private so only you, or your team, can access it)
Here, under “URLs,” go to “Domain” and select your staging site. (Another way to access this is by going to Security > Protected URLs).
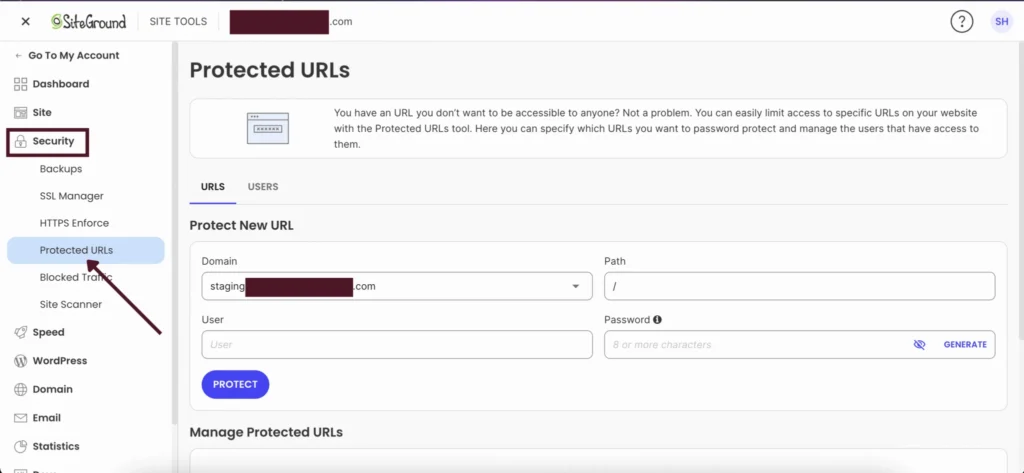
Under “Paths,” don’t forget to add “/” so that your entire staging site is protected and not just the staging.yoursitename.com part (yes, it’s possible to create logins for certain parts of both your staging and live site but don’t worry about that right now).
Go to “User” and “Password” to set up a username and password for your staging site.
This makes sure that your staging site is always private. When you go to staging, you’ll see a popup show up with user and password sign in. Once you enter the details you set up, you’ll be able to access the staging site.
3. Adding an SSL to Your Staging Site
Next, you’ll want to add an SSL certificate to staging. If you don’t add this, your browser won’t let you access your staging site.
SSL certificates create an encrypted connection and establish trust. They ensure that user data is secure, verify site ownership and they’re a way to prevent hackers or fraudsters from creating a fake version of your site. By installing an SSL certificate, you’re basically establishing that this is your website.
So, here’s how you do it.
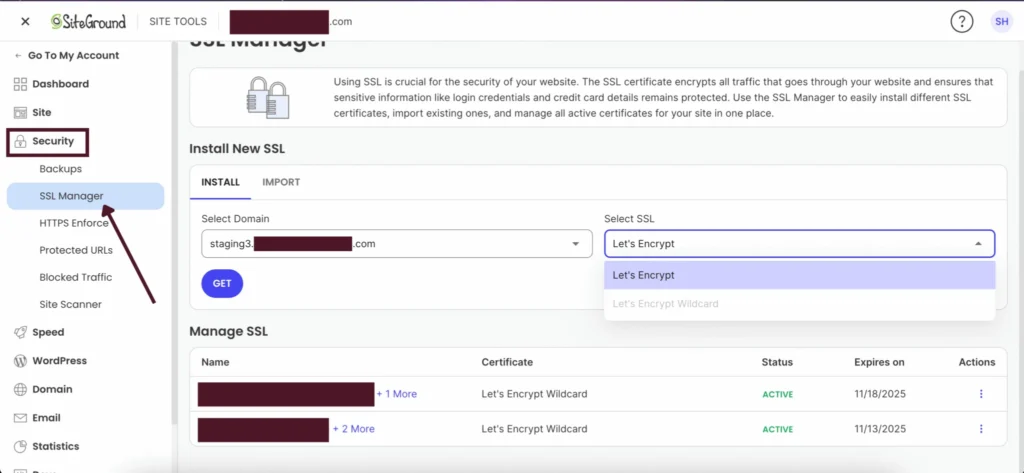
Go back to your “Site Tools” dashboard. This time, on the left sidebar, go to Security > SSL Manager.
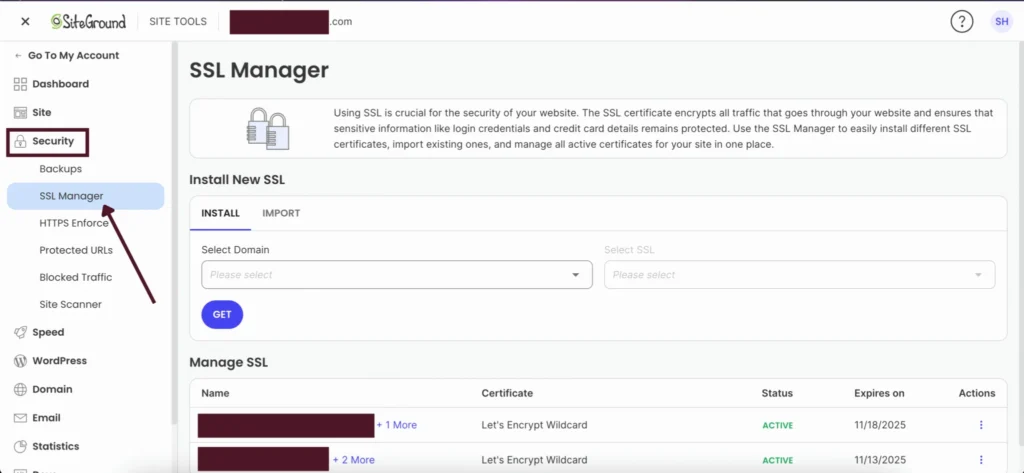
Under “Install,” go to “Select Domain” and choose your staging site. Then under “Select SSL.” choose “Let’s Encrypt.”
Once you’re done, click on “Get.”
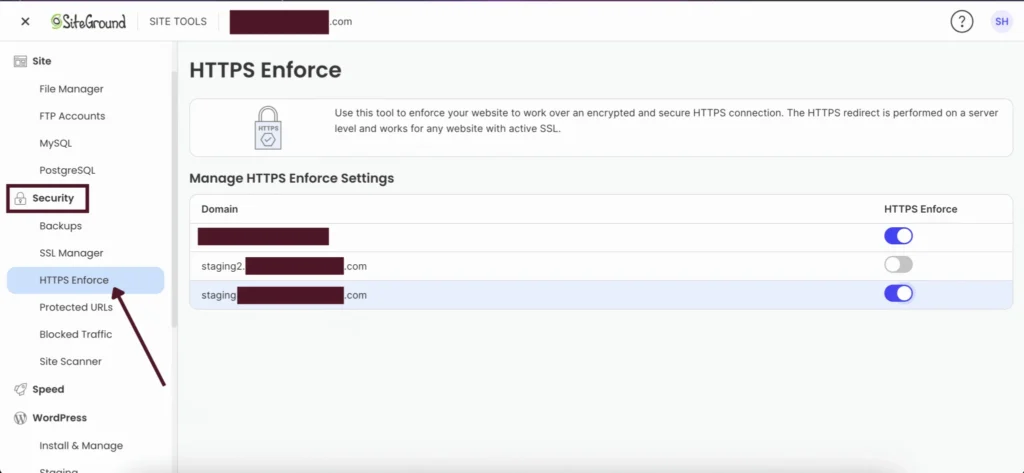
4. Configuring HTTPS
For your staging site to work properly with your SSL certificate, you need to configure WordPress to work through HTTPS. For this, go back to the “Site Tools” dashboard. Once again, on the left sidebar, go to Security > HTTPS Enforce.
Under “Manage HTTPS Enforce Settings,” make sure to turn ON the toggle for “HTTPS Enforce” next to your staging site. It’ll turn blue to mark on.
And That’s It! You’ve Set Up A Staging Site!
You can now go to the staging URL, and after entering the logins you set up earlier, you can access the site.
To log into WordPress of your staging environment, simply add: wp-admin in front of your staging URL (so it’ll be like staging.yoursitename.com/wp-admin). You’ll enter the same username and password you use on your live site to get into your WordPress dashboard.
From now onwards, you can redesign, add or remove templates, plugins and what not without worrying about it affecting your live site.
Once you’re ready, you can deploy your staging site to replace the live one. I’ll talk about that in a future blog.
I’m working on a checklist you can use before you deploy your staging site. It’ll make sure that the process is seamless and literally takes a few minutes tops. So, watch out for that one!


You May Also Like

How to Write Effective Endings

Blogging 101: Everything You Need to Know About Guest Posting